Lesson:
Molluscs: Snails, Bivalves and Octopus
For: Grades 1-3 (can be adapted to higher grades quite easily)
Unit: Science
BY: Robynn
Honeychurch and Avril Bourquin
Length of Lesson:
Approximately
3 hours*
*Please note that this is an extensive lesson plan containing lots of information
and ideas. You, as the teacher should take the time to read through the following
pages and determine which activities will work best for you and your students.
Instructional
Goal
To provide students with an introduction to the invertebrate phylum of, mollusca
and to help them gain a basic understanding of molluscs in general.
In this lesson plan, three main classes will be discussed in general. Those
classes are; the gastropods, bivalves and cephalopods. The main emphasis will
be on the terrestrial (land snail) gastropods. Discussions will cover such things
as anatomy of the snail, needs of the snail and procreation of the snail. Your
students will also learn how and why molluscs are important to humans and the
environment.
Performance Objective
Students will create a report, including drawings and notes based on their observations
of the snail, and what they've learned about them during the lesson. Students
will participate in a discussion about molluscs, their value to humans and the
environment.
Rationale
Molluscs are an integral part of our environment. In studying this life form,
students will observe the way these animals are a very important member of our
world today. The mollusc's reliance upon the environment in which they live,
and the way in which humans rely on them, exemplifies the interconnectedness
of all the ecosystems of the earth.
Lesson Content
- Introduction to molluscs,
using terrestrial snails as the focus. Students will
- a) hear an educational
story about snails "Sammy's Adventure"
- b) observe snails in
a simulated natural environment (terrarium)
- c) draw what they have
seen
- d) record facts they've
learned about snails
- Introduction to the
main classes of molluscs: gastropods (ex.: snails), bivalves (ex.: oysters
and clams), and cephalopods (ex.: octopuses).
Students will:
- a) discuss what
these animals require to live,
- b) discuss how humans
use and have used molluscs,
- c) discuss the importance
of a healthy environment to molluscs and thus to humans,
- d) study, label and
draw collected shells and create a display
- e)colour pictures
of molluscs
- f) continue with
other suggested projects to further explore the subject of molluscs.
Planning Ahead
The following steps should be taken well in advance of teaching this lesson:
-
Print out a copy of
this lesson plan for yourself to follow. Decide what printed materials will
be used for your lesson and have the appropriate pages photocopied.
-
Research your locality
for available resources such as, museums with shell collections, local aquariums,
local shell clubs and or shell collectors in your vicinity. Often you can
find someone willing to come into your classroom to present and display
their shell collection. Field trips may also be planned as part of your
lesson plan.
- Teachers should also
collect some shells to share with their students. Do this a few weeks before
you first lesson. Check your local museums, ask friends, look for shell clubs
in your area. Many people collect shells and may have some to lend you.
- To find local shell
clubs: go to: Man and Mollusc International Shell clubs at: /links_mala.html
- For museums and aquariums,
go to: /links_museum.html
- Often there are shells
to be found on lakeshores, by creeks and rivers and always near the seashore,
should you have access. Live clams, oysters, mussels and many other shells
can be collected. To preserve in intact mollusc, place the entire specimen
in rubbing alcohol or you may take out the inside mollusc and preserve
just it in alcohol to show students, clean the shells and share them as
well. Also be aware of collecting bans for your area as many molluscs
are on the endangered or protected species list
- Several weeks before
your first Mollusc lesson, encourage your students to look for shells of all
kinds. Perhaps their relatives or friends will have shells which they are
willing to lend out. Place each student's contribution in their own labeled
bag, so that shells can be returned to the rightful owner after the completion
of the lesson.
If you live by the seashore,
or lakes, or rivers encourage students to bring in their own shells to class.
Make sure these shells are clean (a mild bleach and water solution under
adult supervision cleans up most shells) and not inhabited or filled with
decaying matter. These shells should also be placed in bags and labelled
with the students name. You may also prompt the student to place a paper
with their find as to where the shell was found the date it was found and
if it was alive or dead when collected. Have them write down as many details
as they can in regards to their finds.
*** Be sure to heed
this, and share this with students: if shells are brought from far away,
make sure there is nothing living in them! Clean out the shells before they
leave their place of origin. The propagation of misplaced molluscs can cause
serious environmental and ecological damage!
-
If in your lesson plan you are
going to include living nails in a terrarium or aquarium; be
sure you have the appropriate food, water and
other necessities such as a calcium source available for feeding the snails
that you will collect and house.. Have your snai'ls terrarium or aquarium
created BEFORE you collect or purchase your snails. (See the MATERIALS section
below for instructions on creating your snails' home.
-
If you plan to use garden
snails for your students to observe, plan to collect them well before you
want to use them in the classroom. Sudden changes in the weather can send
an apparently plentiful supply into hiding so that none will be available.
This is also good advise if using live freshwater snails.
Often live terrarium or aquarium snails can be purchased at pet stores.
See details of collecting and looking after snails at the bottom of the
Materials and Aids section of this lesson plan.
-
Before your first lesson,
Print out "Sammy's Adventure" story, additional activity pages
and any other handout information sheets you plan to use for your class.
You may also wish to photocopy the colouring pages included at the end of
this lesson plan. Photocopy as many copies of each as you will need. All
materials found on this lesson plan are the property of Man and Mollusc
and are uncopyrighted for educational use and can be freely used for all
educational needs. The exceptioon is "Sammy's Adventure" This
story is copyrighted but may be used freely for all classroom lessons. An
illustrated "Sammy's Adventure" story book will be published within
the next year (2002). To learn where and when this book will be available,
check with the owner, Avril Bourquin: avril@rockies.net
-
Optional:
A few weeks before you teach this lesson, check through some of the sites
listed on the Additional Resources section at the end of this lesson plan.
There are extra more games, puzzles, pictures or information about molluscs
that you may wish to use.
- A few days before your
first class, search out books at your school or community library on molluscs
to bring into your classroom and share with your students. Bring as many of
your School Library books on molluscs to your class as possible. This way
students will know what to look for in their own school library.
Optional Ideas that take some pre-planning
-
Escargot can usually
be bought ahead of time at most grocery stores and can be brought in to
class to show students an example of edible terrestrial snails. For class
use; open a container of escargot, wash and place them in a clean container
filled with rubbing alcohol. Replace alcohol, as needed, when it begins
to go brown.
-
Oysters, clams, scallops
and mussels can usually be bought ahead of time at most grocery stores to
be preserved for class as well.
-
Living marine molluscs
can also be purchased of found nearby if you live at the ocean and these
may be kept in a saltwater aquarium and kept alive for the classroom. Use
local beach water for these specimens unless you are used to maintaining
a salt water aquarium. This water must be replaced regularily and an airation
stone is a must. I would only encourage you to keep such living speimens
for one day only unless you are proficient at salt water aquarium keeping.
-
If you are a really
ambitious and creative teacher you may even decide to cook up a seafood
meal for his/her students as an introduction to this mollusc unit. Parents
may also be of help in preparing a seafood or molluscan feast . Notes sent
home with a student well in advance of this lesson may help you to locate
volunteers.
-
A field trip could be
planned to search out molluscs; (snails oysters, and clam, etc.) and to
observe them in their natural habitat. Seashore rock pool or tide pools,
lake shores creeks, and rivers make an excellent field trip. Visit these
areas well in advance of taking your students so that you know for sure
where to locate snails. If going to a beach, be sure to know what the tide
status will be for this day as well. Tide and rock pools may totally disappear
if you have a ghigh tide. Also be sure to have adequate supervision for
all students if undergoing such a fiels trip. Once agin, check wheter or
not you have a local shell club which might be of help to you on such a
trip.
-
Museums or aquariums
with a focus on sea life or molluscs can also make a good field-trip destination
for this unit. Often if you speak to the curators of such facilities, special
arrangements can be made to have a special display and onsite talk for your
class. Give these people as much time as you can for arranging such a visit.
Materials and Aids
- Copy of the lesson plan
- Rubbing alcohol and jars
with tight fitting lids for preserving any living tissues to be used for the
classroom
- Bags and labeling pen
for storing the students' shell contributions
- Collected shells (found
by students or teacher or both)
- "Sammy's Adventure"
story (enclosed at the end of this lesson for printing out)
- Colouring pictures (also
enclosed at the end of this lesson plan)
- Printed handouts on
molluscs for students (also enclosed at the end of this lesson plan)
- A large piece of coloured
Bristol Board or poster paper for a final display
- Miscellaneous sheets
of coloured paper
- Blank paper, pencils
and erasers for drawing snails and recording facts
- Crayons and or pencil
crayons for colouring pictures and drawing snails and shells
- Scissors for children's
use
- Glue
- Terrarium or aquarium
with snails, plus their food and water source. Keeping a living exhibit is
discussed in the next section of this plan
Instructions on assembling
a terrarium exhibit are as follows:
Active snails can be kept
for classroom viewing in a terrarium made from an aquarium, a large, wide mouth
jar turned on its side, or a fish bowl. The top should be securely covered with
screen or part of a nylon stocking. Lids which have holes punched in them do
not allow adequate ventilation and the sharp edges on the interior are a safety
risk to both snails and students.
To collect terrestrial snails
you will need a shovel,and a container (to put your snails in). Make sure your
container is not airtight so that the snails can breathe by making tiny holes
in the lid. Use a plastic container to avoid sharp edges. (You need a lid to
cover your container because snails can crawl on any texture or surface.) to
find the snails; choose a damp spot such as, under leaf litter or near a pond.
Use your shovel to loosen the ground and you should find many snails just beneath
the surface. Be sure to collect some of the soil or leaf litter for use in your
terrarium.
Terrestrial snails may be
collected around gardens and in trees in your own area. Be sure to locate these
well in advance so you know where to find them for your classroom. Be sure to
know what they eat and include it in your terrarium. Keep the terrarium clean
and food and water supplies clean. Plan to release these snails back to their
original home upon completion of the lesson. If they are a known pest, you might
well have them properly destroyed and keep the shell for future use.
In your terrarium, water
can be supplied in a shallow, plastic lid, in a deeper dish containing a water
soaked sponge, or by generously sprinkling lettuce or other fresh, leafy food
with water. Create a sample habitat by including damp soil, or sand, plants,
and rocks.
Food can also be placed into a shallow plastic lid in the terrarium. Most terrestrial
snails are vegetarians and eat many kinds of plant material. Cornmeal, oatmeal,
and fresh green leaves are all appropriate foods. Chalk, a cuttlefish bone from
pet store (NOTE: this is a mollusc) or eggshells should be placed into the terrarium
to provide the calcium necessary for healthy shells.
Cleaning to remove moldy food, the build up of mucus, and droppings, should
be done on a regular basis.
Overcrowding the snails should be avoided. In terrariums, too many snails in
too small a space, or inadequate ventilation can cause the humidity to rise
to unacceptable levels and the snails will die.
If time permits, (are you
keeping the snail for a few weeks or more) , the lifecycle of the snail can
be observed in the classroom. Adult snails can be recognized by a small lip
that is added to the open end of their shell when growth is complete.
Most terrestrial snails are hermaphroditic (each snail had both male and female
sex organs), any two snails can mate. Each fertilizes the eggs of the other.
The eggs are usually laid in a hole that the snail digs in the damp soil or
under bark or damp leaf litter The small, translucent white eggs about the size
of small peas.
Snails which withdraw into their shells during class can usually be coaxed out
by a brief dip in a shallow container of water.
Upon completion of your
lesson, plan to return all snails to their original home. If they happen to
be a known pest species, they may be disposed of appropriately and their shells
cleaned and kept for future lessons. Soft parts may also be kept in formeldyhye
or rubbing alcohol.
Instructions on assembling
an aquarium exhibit are as follows:
For freshwater snails, search
along the lake shores river or creeks. Be sure to look under wharfs, stones
and on water plants. Use a fine meshed collecting net to retrieve snails. Be
sure to collect a good supply of the water the snail is found in. This is the
best way to make sure the snail remains healthy. Use only this water (you may
add an aeration stone, and filter system to keep the snails healthy and happy.
Rocks covered with mosses and algae found around the snail should also be added
to the aquarium. This aquarium should also have a lid or stocking cover as pond
snails sometime do crawl out of the water.
You may have a fully water-filled
aquarium or just a pool of water around such things as rocks and old tree branches
from the area where you found the snail. This allows the snail to crawl on and
up out of the water. An aquarium lid or mesh top to prevent escapes is still
a vital part of this setup.
Be sure to return all living
snails to their place of origin or have them properly disposed of, if they by
chance are a known pest species, at the completion of your lesson.
Sometimes salt water molluscs
can be found at a pet stores or if you live by the ocean, they may also be collected
on the seashore around rocks in the inter-tidal zone. Once again, be sure to
collect a good supply of the water where they live for your aquarium. These
molluscs should be returned back to the ocean ASAP as they will not survive
long in a simple aquarium
If you are going to use
an established salt water aquarium, I would strongly suggest that you understand
the basics of maintaining such an aquarium. Another option would be to have
a knowledge person placed in charge of your aquarium for you. Check at your
local pet shops for such help.
Teaching Procedures
-
Teacher should encourage
students to share what knowledge they have about molluscs ahead of actually
starting the lesson. Have
students bring in shells and bag and label them as discussed above. This
may be done any time before the beginning of the actual lesson plan.
-
Teacher will read "Sammy's
Adventure" to students, first instructing students to listen for the
facts about snails that are hidden throughout the story.
-
Teacher will ask students
what they have learned about snails from this story.
-
Students will be asked
to carefully observe the snails in their habitat (the terrarium or aqaurium
that the teacher has prepared.) Send students up in groups of four to study
the habitat, while the other students remain in their seats and record,
in note form on the same sheet where they will draw their snails, the facts
they've learned about snails from the story they heard.
-
If there's time and
you're using terrestrial or pond snails, teacher can remove several snails
from the habitat, and place them on mosit surface such as a big leaf from
a head of lettuce. Encourage students to gently touch and pick up the snails
so that they can closely observe their colours, shell pattern, body shape,
size and texture. Remind students that they will be returning to their seats
to do a detailed drawing of the snail they've observed. Have students also
observe the contents of the habitat bottle, so that they can draw these
in as well. If including this part of the lesson, YOU MUST have a place
for the children to wash their hands well or at minimum have good disinfecting
hand wipes available for use after handling the snails.
-
Students will return
to their seats and draw a snail in its habitat from memory, and write any
additional facts or observations that they have learned from observing the
snails. Encourage students to draw in as much details as they can: including
the foot, tentacles, eyes, body and shell.
-
Handout the snail diagram
for students to study and label.
-
Teacher will discuss
the following facts with students:
-
Teacher will encourage
students to brainstorm:
(If desired and have them prepared, hand out the pages on Introduction to
Molluscs, Cephalopoda, Bivalves, and Gastropoda. These pages are from Man
and Molluscs Beginner's Introduction to Molluscs found at: beginners_guide.html.
The appropriate pages are also
printed at the end of this lesson plan.)
-
What other sea creatures
and land beasties can your students think of that might be molluscs? (be
sure not to get mixed up with such things as starfish, sea biscuits and
sand dollars etc, which are echinodrems)
-
What do your students
think these molluscs eat? ( you may want to talk about herbivores, carnivoires
and paratsites if the age group lends to this. Filter feeding bivlaves to
the hunting carnivoires such as fish-eating cone shells may be touched upon
here as well.)
-
What do molluscs need
to live? (food, mositure, and a clean oxygen supply)
- Can students think
of ways in which humans use molluscs? And their shells?
- Most molluscs can be
eaten by humans. Some of our favorites are scallops, oysters, clams and
escargot (land snails - Helix aspersa L.) To give you an idea of the extent
of this food source, you may want to visit the Data Base of Edible Molluscs
on the Man and Mollusc web site. The URL for this is: molluscan_food_mp.html
-
Shells have long
been used by man as tools, and buttons,jewelry, etc. See the Man and Mollusc
Article: Uses of Shell-Bearing Molluscs - Past, Present & Future located
at :man_and_molluscs_a.html
-
What do your students
think happens when the environment (ocean) where molluscs live becomes polluted:
like with an oil spill or when sewage, industrial pollutants and garbage
gets dumped into the earth's water systems?
Ballast water from ocean liners is also another danger to ports. This is
how such things as the zebra mussel got into the Great Lakes where they
have created massive damage.
Snails moved from one habitat to another may become bad pests and devastated
crops and other vegetation.
-
Discuss with your students
what happens when the environment is disrupted due to lack of molluscs that
were once present or when new introduced species overruns an area. Animals
and man that feed upon this mollusc are losing a food supply. Where invasive
molluscs go, food supplies that other rely on are in jeprodised and or crops
may also be destroyed. How does all this affect man?
- Age level and time permitting,
you may even want to touch upon some ways in which the medical world is presently
studying molluscs. Such things as pain killers, cancer cures, skin adhesives
for operations and materials for healing broken bones are being developed
from molluscs.
Medically, molluscs are also responsible for spreading many illnesses such
as schistosomiasis. More information on Molluscs and Medicine can be found
on the Man and Mollusc site at: /links_medicine.html
NOTE: Students can
write down additional facts on the report they are creating about snails, as
the discussion progresses. Teacher should prompt for this, writing key words
and ideas on the board.
General
Mollusc Information That Should Be Covered:
A more complete list
of molluscan facts to cover is in the next section on" Snail
Facts to Refer to When Discussing and Marking Projects":
- Molluscs have been around
for over 500 million years.
- To live, all molluscs
must have: food, oxygen and moisture. Most molluscs live in the ocean or,
if on land, in moist places such as under leaves or in soil, some need a sandy,
ocean environment. All molluscs require moisture to stay alvie. Even the desert
dwelling snails are no exception as they maintain thier own moisture inside
their shell by means of a trap doors and or a or mucus plugs.
- Many molluscs eat: plants
(herbivores) or plant cell material in the water. Terrestrial snails like
to eat fresh leaves and decomposing material. This can be beneficial because
they break down decomposable materials, but snails can also become pests when
they turn their attention to garden greens. Many water molluscs eats mosses,
algaes and such other microscopic plants.
- Other molluscs are carnivores
(eating such things as fish and other molluscs) and some are even parasities
(living within another living host)
- Most aquatic molluscs
filter oxygen from the water to "breathe" by means of gills . Terrestrial
and some pond snails breathe using lungs (Pulmonary sacs) just as we do. Some
pond snails have both gills and modified lungs. Deep ocean trenches do have
molluscs that do not utilize oxygen.
- Polluted waters lack
oxygen and food for molluscs and other water creatures to eat and "breathe".
This makes them sick and they die and their babies don't hatch or don't live
long. When molluscs disappear, the fish and birds and mammals (like otters)
that eat them have less food and some of these animals begin to die. Then
there is less fish and molluscs for us to eat, too. If the water they live
in is really polluted, the molluscs and fish that survive won't be safe to
eat. All the parts of our environment are connected and so you can see how
important molluscs are, and how important a clean environment for them to
live in is.
- Most molluscs can be
eaten by humans. Some of our favorites are scallops, oysters, clams and escargot
(land snails - Helix aspersa L.) To give you an idea of the extent of this
food source, you may want to visit the Data Base of Edible Molluscs on the
Man and Mollusc web site. The URL for this is: molluscan_food_mp.html
- Today as in the years
past, many people love to collect shells for their beauty and interesting
shapes. People who study the shells are called Conchologists. Those scientists
that study the molluscan animal are called Malacologists
- Shells have long been
used by man as tools, and buttons, jewelry (pearls and cameos), etc. See the
Man and Mollusc Article: Uses of Shell-Bearing Molluscs - Past, Present &
Future located at: man_and_molluscs_a.html
- Dyes can be produced
from shells for use in colouring cloth. This is not so important today as
we have much cheper synthetic dyes. The Royal Purple garbs of monarchs of
the past were made from molluscan dyes. This is discussed further in The Man's
Uses of Molluscs article (man_and_mollusc.html)in
the section: Personal Adornmet (8); personal_adornment.html
Snail
Facts to Refer to When Discussing and Marking Projects:
Molluscs (Mollusks; both
spellings are correct)
- Molluscs can be found
in gardens, in ponds, deserts and oceans. Some live in the tops of trees and
others high in the mountains-and there are probably some in your back yard!
- They belong to the group
(phylum) of invertebrqte animals with a soft bodies known as molluscs Characteristically
they have soft, unsegmented bodies. Often, their soft bodies are protected
by a hard shell.
- a gastropod in Latin
means, gastro for stomach and pod for foot.
- a cephalopod in Latin
means head - foot
- Bivalves or Pelecypoda
in Latin are called hatchet - foot
Gastropods: Terrestrial
or Garden Snail Facts :

Achitina fulica (Giant African Land Snail)
- Terrestrial gastropods
often have a shell to protect their soft body. Some like slugs have no shells.
- The body of the snail
is usually moist and often slimy.
- Snails have tentacles
with eyes on the ends. They have a very developed sense of smell, but do not
feel much sensation/touch-wise. They do not hear or taste food like we do
and their behavior is instinctive.
- The eye is on the tip
of the tentacles. The snail has two pairs of tentacles on its head. One pair
is longer than the other pair. The eyes are on the longer pair. The shorter
pair is used for smelling and feeling its way around. The tentacles are very
important to a snail.
- Many gastropods are
autonomous, meaning they can regrow lost body parts.
- When the snail is disturbed,
it simply withdraws or pulls its body back into its shell. The snail then
seals the entrance with a mucus plug or a trap door, called an operculum.
Many snails also use this trap door, to hold in valuable mositure during dry
spells.This door is located on the top of their foot and when danger is around
or they are required to maintain moisture, this operculum closes them into
their shell.
- When land snails are
threatened and want to hide, they go beneath leaves, stones or logs.
- The majority of snails
are most active at night and on cloudy days. It does not like the sunshine
very much.
- Snails do not like hot
and dry conditions. They like it moist or humid and not too bright.
- During very cold weather
or winter, it hibernates in the ground. During dry periods (droughts) molluscs
also pull into their shells or create a mucus cocoon to keep in valuable moisture.
This kind of hibernation is called aestivation.
- Snails have different
shaped shells. It can be a single shell that is rounded or a pointed spiral
or flat. They are often brightly coloured or some even have spines and ridges
as well.
- A snail has fingernail
file like tongue called a radula in its mouth for scraping food particles
off. This radula is like a rough tongue-like ribbon, something like a file
with rows of tiny teeth, which it uses to scrape off bits of leaves and flowers
to eat.
- Snails eat mostly living
plants as well as decaying plants. They also chew on fruits and young succulent
plant barks.
- The snail moves by creeping
or gliding along on a flat "foot" underneath it's body. The band
of muscles in the foot contracts and expands and this creates a kind of rippling
movement that pushes the snail forward. The "foot" has a special
gland that produces slimy mucus to make a slippery track. You can often see
these silvery tracks in the garden. The slime comes out from the front and
hardens when it comes into contact with air. The snail is able to move on
very sharp pointed needles, knife, razors and vines without being injured
because the mucus-like secretion helps to protect its body.
- The garden snail travels
about 70 cm every 3 minutes-that's 1 km every three and a half days.
- Many snails are both
male and female. Therefore, it can produce sperms and eggs at the same time!
However, to fertilize the eggs, the snails need to exchange sperms with each
other. An animal that is both a male and a female is called a hermaphrodite.
This method of reproduction comes in very handy as these snails are very slow
moving and don’t like moving around too much. If they had to go looking
for a boyfriend or girlfriend, it could take them a very, very long time to
have babies.
- The brown garden snail
lays about 80 spherical shaped white or yellowish coloured eggs at a time
into the topsoil of the ground. It can lay eggs up to six times a year. Snails
take about 2 years to become adults.
- After mating, each snail
will go search for soft ground to dig and lay its eggs in.
- The snail lays its eggs
in a nest, 2.5 to 4 cm deep in the soil or under tree bark o4 ground leaf
litter. Each snail can lay an average of 85 eggs and they hatch in 2 to 4
weeks, depending on the temperature and moisture of the soil.
- The first thing that
a newly hatched snail does is to find food. It will eat whatever is left of
its eggshell too. As the snail grows, its shell grows too, in a spiral shape.
The new shell is added at the opening of the shell. The part of the shell
the baby snail was born with, ends up in the middle of the spiral.
- Snails have many natural
enemies. They include ground beetles, snakes, toads, turtles, and birds, including
chickens, ducks and geese.
- The largest known land
snail is the Giant African Land Snail. It can weight up to 2lb (900g) and
measure up to 15.5 inches (39.3cm) from snout to tail.
- Many land snails are
very strong: they can lift 10 times their own weight, even moving up the side
of something-like a tree.
- Snails can live up to
10 years depending on which species you look at. Some have been known to live
up to 15 years or longer.
- Many people get upset
and farmers get angry when snails eat their plants and crops. Snails can cause
serious damage to crops.
- Terrestrial snails are
the food humans eat as escargot. The flesh of the snail is very delicious.
The French people, especially, love to eat these snails.
- Some people keep snails
in aquariums together with their fish. However, they must make sure that they
control the number because snails reproduce rapidly !!
- Many types of terrestrial
snails such as the helicidae or escargot snails are actually farmed today.
This farming method is called Heliciculture.
Gastropods: Aquatic (Pond
or other Freshwater) SNAIL Facts:
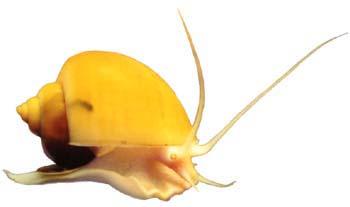
Pomacea bridgesi (Golden apple snail)
- The pond snail is, in
many ways, like the garden snail.
- Pond snails are usually
tan or dark brown in colour.
- Some pond snails have
gills to breathe in water. Those with gills will live at the bottom of the
pond. Those that do not have gills will come up to the surface to breathe
and have pulmonary sacs which act like our lungs. These snails will live on
the surface so that they can come up to breathe easily.
- You can often buy pond
snails from a pet or aquarium stores. One common pond snail often sold is
called "Apple" snail or golden snail.
- The pond snail feeds
mainly on plants like algae and microscopic creatures that are found on the
surface of waterweeds. They eat by scraping bits off with their rough, sandpaper-like
tongue, just like the garden snails.
- When pond snails are
threatened and want to hide, they bury in the sand, or hide beneath rocks
or logs on the bottom of the pond. In the ocean, snails will hide in caves,
or on rock ledges.
- Some snails have pointy
spines on their shells to keep their enemies from eating them; some have very
heavy shells that discourage their prey. Some snails have a body that comes
over their shells to camouflage them from those that would eat them, and some
are poisonous to fend off prey.
- Most pond snails reproduce
just like the garden snail. It is a hermaphrodite. The only difference is
that, unlike the garden snail, the pond snail carries its fertilized eggs
with it or stick them onto or under foliage or stones. If carried around on
their mother's shell, the baby snails will only leave their mother when they
are hatched.
- Some pond snails can
swim and others can bury themselves in the sand very quickly.
Marine Gastropods Facts
(these are the conchs (Strombidae), whelks (Buccinidae), limpets
(Lotiidae), periwinkles (Littorinidae), cones (Conidae), volutes (Volutidae),
and cowries (Cypraeidae) that we mostly know)
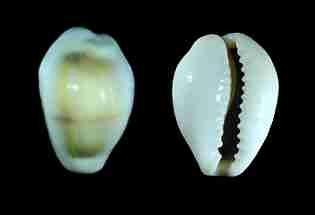
Cypraea moneta (Money cowrie)
- Most seashells that people
recognize and pick up along our beaches fit into this group of molluscs
- Most have a coiled shell.
Their soft bodies have a head complete with two eyes located on the tops of
two tentacles
- They have a big flat
foot, which they use for locomotion and on the back end of this foot is a
structure called an operculum, which acts as a trap door
- Most breathe through
gills; however, some absorb oxygen from the water directly through a specialized
membrane (something like the thin skin lining the insides of your cheeks)
lining their mantle cavity.
- Many of these molluscs
have very colorful bodies. Some members in this class only have a very small,
fragile shell and it is often contained right inside their soft bodies or
they may not have a shell at all. We know some of the Opisthobranches as:
sea hares, sea butterflies (Thecostoma), sea slugs (saccoglossans and nudibranchs),
and canoe (Scaphandridae) and bubble shells (several families).
- All cone shells possess
a poisonous dart (a modified radula) with which they harpoon, inject venom
and thus kill their prey. Some cone shell possess venom is so toxic that if
stung, it can severely harm or even be fatal to man.
- Many members of the Carrier
shell family collect seashells. These shells scientists call Xenophoridae
attach other shells or stones to their own shell for protection and camouflage.
Sometimes they even use man-made objects such as glass and bottle caps!
- The largest snail (univalve)
known attained a length of 78 cm (two and one half feet) with a girth of nearly
forty inches. This trumpet conch, Syrinx aruanus (Linneus, 1758), weighed
in at nearly forty pounds.
- The smallest known snail
shell is the Ammonicera rota and measures only 0.02 inches in diameter. Fifty
of them laid end to end would measure one inch!
- "Pelagic" gastropods
live their entire life without ever touching bottom or shore! They float and
travel on the ocean's currents. The violet snail, the Janthina, can travel
hundreds of miles in its lifetime as it floats around on the ocean's currents.
Its delicate shell only touches land when it gets washed up onto beaches during
storms.
- Money cowries were the
first item used by man for trade and a monetary system. Other examples of
this is the wampum trade beads used by the North American Indian.
Bivalve Facts:
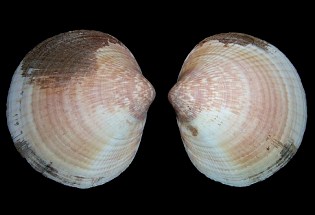
(Giant Bittersweet Clam)
- Covering their soft body
is a thin membrane called the mantle (like a thick piece of skin). The mantle
takes lime and calcium out of the water and turns it into a twopiece shell
- Bivalves all have this
two-part shell which is hinged together. These two shell parts are called
valves. They open and close these valves by using strong adductor muscles
and ligaments much like you bend your elbow or knee.
- They have a siphon (like
a short, fat drinking straw that feels like rubber) which they use to pull
in water and tiny animals that live in the water. They extract both oxygen
and their nutrients from this inflow of water through gills which can filter
out the tiny food particles from the water and pass them on to their stomach
where they are digested.
- If a foreign object such
as a piece of sand gets into their soft mantle, it HURTS, so they take the
same smooth shelly material that we put on the inside of their shell and cover
the offending object up and guess what! They just made a pearl.
- Most bivalves reproduce
by laying millions of eggs into the water surrounding us. The male bivalves
then release their sperm into the same water. If the eggs and sperm meet,
a new baby bivalve is born. However, some species hold their eggs in a space
called the mantle cavity in their body. The males still spurt their sperm
into the water and when she pulls this water in through her siphon, the eggs
are fertilized. These are then brooded inside her body until she knows they
are big enough to live in the water. She then releases them into the water.
All baby bivalves start life as tiny specks, (larval stage of growth) swimming
in the water. When these larva become big enough, they start to settle onto
their new homes. When they are still young, yet settled, they are called "spat".
- Some molluscs, such as
the oysters, change sex. Some like oysters even alternate their gender. Male
one year, female the next!
- Some bivalves like to
live attached to hard objects such as rocks or manmade objects. Some live
all their lives buried beneath the sandy or muddy ocean, lake or stream bottoms.
Some actually live inside wood. These bivalves (known as ship worms) have
caused man a lot of trouble when he used to sail in wooden ships. HE ATE HOLES
IN THE SHIP and it often SANK. They still attack warves and other wooden man
made structures causing a lot of damage. Some of my other species are parasites,
meaning that they live inside a living host, such as a fish, and survive by
eating part of the host.
- Bivalves can be very
long-lived. The ocean quahog (Arctica islandica Linne,1758), can live to be
220 years old.
- The largest known bivalve
harvested was a Tridacna gigas(Linne, 1758), which weighed 330kg (734 pounds),
and was 1.4m (nearly four feet) in length!
- Bivalves are a very important
food source today. Many are actually farmed for their meat and some for their
valuable pearls. Marine snail farming is called Aquaculture of mariculture.
Cephalopod Facts

Giant Pacific Octopus
- These are your octopus,
squids and cuttlefish
- All species are marine
- Most such as octopus
are highly intelligent as compared to other molluscs and have large heads
and very complex brains
- Most have two large complex
eyes and use them to see almost as we humans do
- They have cells in their
skin, called chromataphores, which enable them to rapidly change skin color
and pattern whenever they want to. They do this when regestewring fear, pain,
sorrow, etc.
- Octopus have 8 tentacles
or legs.
- Squids have 10 tentacles
or legs. Two are longer and are used for clasping prey.
- Octopus can squeeze their
bodies through remarkably small openings. A large octopus could easily crawl
through a pop can that had been opened at both ends.
- All cephalopods breath
through gills, and have three hearts.
- All cephalopods are all
carnivorous predators (catch live food) eating such things as other molluscs,
fish and other marine invertebrates. They crush their food in a hard bill
then rasp off bits with the radula (like a fingernail file) located in their
mouths
- The only cephalopods
that have a shell are the nautilus.
- Others such as the argonauts
do have a shelly nursery in which they deposit their eggs and where they are
incubated, but this is not a true shell.
- Cuttle fish have a bony
internal structure (long oval chalky "bone") which is used in birdcages
as a dietary supplement and for keeping their beaks in good condition.
- Some squid do have a
small, fairly fragile, coiled shell inside of their body. These tiny white
coils often wash up on beaches.
- Most cehalopods are fast
swimmers
- Most cephalopods have
separate sexes and fertilization is internal. The males produce a "sperm
packet" which he places inside the female’s body using one of his
tentacles. Sometime later, the female then lays eggs. Many cephalopods are
good mothers and stay with their eggs until they hatch. They keep clean, fresh
water flowing over the eggs and caress them to keep them clean of derbies.
The young hatch out as perfect small copies of their parents.
- The giant squid living
deep in our oceans do battle with largest whales and may eat large sharks.
These giants can reach a striking 1,600 kilograms (nearly a ton!) and be 18
meters (60 feet) long - but many suspect the biggest ones haven't been found
yet!!! Sperm whales battle and eat these monsters of the deep at depths up
to a km (over half a mile) below the surface - but there is evidence that
sometimes the Giant Squid win the battle!
- The ink that octopus
shoot out when they want to cloud the water and escape is collected by artists
for their use in paintings.
Closure
-
Have students examine
the shells that have been collected for this lesson plan. With the use of
books or Internet resources (like the visual identification kit suggested
in the Resources section at the end of this lesson plan) see if students
can identify their finds. Have each student choose a shell to take back
to his or her desk to draw. Encourage them to use colour. Students can cut
out their drawings once they are completed. Students can arrange cut-out
shell drawings on the large poster board and glue them down. Shells can
be labeled and poster displayed in class. Sample title for this is "Molluscs
We Have Found."
-
Provide students with
colouring sheets to colour in class, or to take home, if there's not time
in class. Discuss what colours the molluscs in the pictures would likely
be (camouflage). Continue on with any additional activities that you wish
to add to the unit.
-
Collect snail drawings
and fact notes.
-
If time and space permits,
keep the snails in their terrarium in the classroom for several weeks. Have
the students help in feeding them and keeping their home clean. Have them
observe the lifecycles of the snails, draw more pictures, and record their
observations in the form of a small report about their lifecycle.
- OPTIONAL: Man and
Mollusc has a children's art and story page set up online where children may
have their works of art, stories, limericks, poems etc. placed. These can
be viewed fro the Children's Zone at: /kid_zone.html.
To have items placed on these pages, contact Avril
Bourquin and arrange for this
Evaluation Procedures
- Evaluate what the students
have learned (gleaned whether or not students are comprehending and absorbing
the information presented). This can be done by:
- discussing and brainstorming
about molluscs with students.
- Have students observe
and draw snails and classroom shells.
- a written record of
the related facts they've learned
- Mark the snail and shell
drawings and listed facts based on: what student has been able to observe,
learn, infer and record about snails, and molluscs in general.
- What students have learned
and inferred regarding the class discussions and story should also be taken
into account and related discussion and story.
- Consider the contribution
each student made to the brainstorm/discussion on molluscs, as well.
- Consider the ability
of each student, the accuracy of their observations, and the time they each
spent on these class projects.
- Optional:If
you have chosen to keep the snails in the classroom and have asked the students
to do a follow-up report on the lifecycle of the snails, make sure to collect
these and mark them based on the accuracy of their observations and the time
they've put into their project.
References
- Man and Mollusc web site:
www.manandmollusc.net
by Avril Bourquin
- "Sammy 's Adventure"
story by Robynn Honeychurch, Anna Palumbo and Avril Bourquin
- "Eye
to Eye with Garden Snails" Lesson plan by Kathy Lu
Additional Resources
- Web pages: Many good
educational pages may be accessed through Man and Molluscs Teacher's Zone
at:
- A Visual Identification
Kit put together by Avril Bourquin to accompany this lesson plan is located
at: www.manandmollusc.net/
- These websites also have
games, pictures and other materials you might use:
Lesson Plan Inclusions:
-
Sammy's Adventure (story)
This story is copyrighted but may be freely used for the classroom without
the owners permission. This story will be available
in late 2002 in an illustrated book. You may wish to conatct Avril Bourquin
(Email: manandmollusc@telus.net)
to learn when, where and how this book can be purchased
-
Snail Diagrams (labeled
and unlabelled)
- Colouring Pages: Choose
those pages you wish to use
- Scallop Shell
- Queen Conch shell
- Spotted Cowrie Shell
- Ole Octopus
- Suggested Handouts
for Students: A Beginner's Introduction to Molluscs: Bivalves, Cephalopoda
and Gastropoda or compete article in printer friendly version: beginners_intro_printable.html
- Visual Shell collection
identification aid
-
OPTIONAL: Additional
Activity Idea: Make an Origami Snail: /origami_snail.html
-
OPTIONAL: Amazing
Molluscan Facts: from Man and Mollusc site: /amazing_facts.html
-
OPTIONAL: Man
and Mollusc: Uses of Shell-Bearing Molluscs Past, Present & Future:
Simplified Version: by Avril Bourquin:
man_and_molluscs_a.html or printer friendly version:
advanced_uses-print.html
_________________________________________________________________________